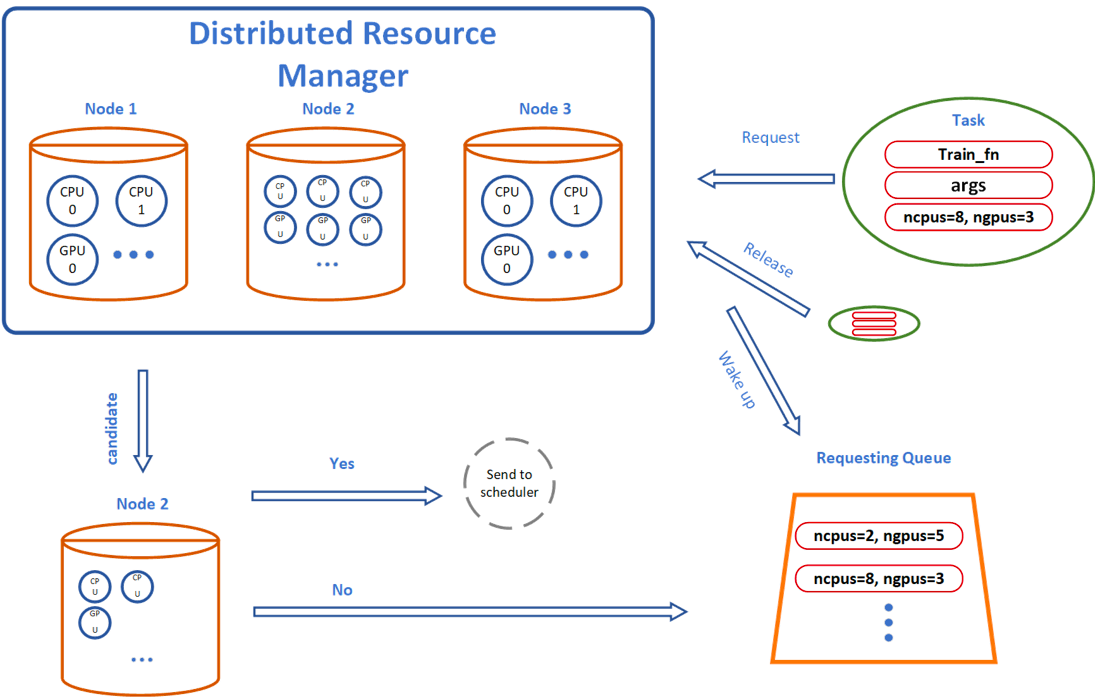
Distributed Search on Dedicated Machines
AutoTorch provide a seamless experience for distributing the hyperparameter search across multiple machines. It will automatically schedule tasks onto remote machines, just like the local one. All communications are automatically handled such that it looks like a big machine with many GPUs to the user. This is a quick tutorial for setting up AutoTorch to leverage discributed compute resources.
Quick Example
Example
Import the packages:
>>> import time
>>> import numpy as np
>>> import autotorch as at
Construct a fake training function for demo
>>> @at.args(
>>>     batch_size=64,
>>>     lr=at.Real(1e-4, 1e-1, log=True),
>>>     momentum=0.9,
>>>     wd=at.Real(1e-4, 5e-4),
>>>     )
>>> def train_fn(args, reporter):
>>>     print('task_id: {}, lr: {}'.format(args.task_id, args.lr))
>>>     for e in range(10):
>>>         top1_accuracy = 1 - np.power(1.8, -np.random.uniform(e, 2*e))
>>>         reporter(epoch=e, accuracy=top1_accuracy)
>>>     # wait for 1 sec
>>>     time.sleep(1.0)
Create a Random Searcher
Provide a list of ip addresses for remote machines
>>> extra_node_ips = ['172.31.3.95']
Create a distributed scheduler. If no ip addresses are provided, the scheduler will only use local resources.
>>> scheduler = at.scheduler.FIFOScheduler(
>>>     train_fn,
>>>     resource={'num_cpus': 2, 'num_gpus': 1},
>>>     dist_ip_addrs=extra_node_ips)
>>> print(scheduler)
FIFOScheduler(
DistributedResourceManager{
(Remote: Remote REMOTE_ID: 0,
    <Remote: 'inproc://172.31.8.238/13943/1' processes=1 threads=8, memory=64.39 GB>, Resource: NodeResourceManager(8 CPUs, 0 GPUs))
(Remote: Remote REMOTE_ID: 1,
    <Remote: 'tcp://172.31.3.95:8702' processes=1 threads=8, memory=64.39 GB>, Resource: NodeResourceManager(8 CPUs, 0 GPUs))
})
Launch 16 Tasks.
>>> scheduler.run(num_trials=20)
>>> scheduler.join_jobs()
task_id: 1, lr: 0.0019243442240350372
task_id: 2, lr: 0.012385569699754519
task_id: 3, lr: 0.003945872233665647
task_id: 4, lr: 0.01951486073903548
[ worker 172.31.3.95 ] : task_id: 5, lr: 0.0006863718061933437
[ worker 172.31.3.95 ] : task_id: 6, lr: 0.0016683650246923202
[ worker 172.31.3.95 ] : task_id: 8, lr: 0.002783313777111095
[ worker 172.31.3.95 ] : task_id: 7, lr: 0.0007292676946893176
task_id: 9, lr: 0.08801928898220206
task_id: 10, lr: 0.00026549633634006164
task_id: 11, lr: 0.0009921995657417575
task_id: 12, lr: 0.08505721989904058
[ worker 172.31.3.95 ] : task_id: 13, lr: 0.04110913307416062
[ worker 172.31.3.95 ] : task_id: 14, lr: 0.011746795144325337
[ worker 172.31.3.95 ] : task_id: 15, lr: 0.007642844613083028
[ worker 172.31.3.95 ] : task_id: 16, lr: 0.027900984694448027
task_id: 17, lr: 0.018628729952415407
task_id: 18, lr: 0.08050303425485368
[ worker 172.31.3.95 ] : task_id: 19, lr: 0.0011754365928443049
[ worker 172.31.3.95 ] : task_id: 20, lr: 0.008654237222679136
Plot the results and exit.
>>> scheduler.get_training_curves()

System Implementation Logic

The main training script (main Python file) is serialized and scheduled remotely. AutoTorch’s distributed scheduler monitors the training process and gathers results.
Any files (such as Python scripts and datasets) beyond the main training script need to be made accessible. We recommand the following practice:
Use
scheduler.upload_files(files_list)to upload individual Python scripts or small datasets to the execution folder on remote machines, so that the main script can import or load these.Make a Python library for many files in the same folder and install it manually on all remote machines.
Upload large files (such as datasets) manually to remote machines and share the same absolute filepath, because the tasks can be scheduled to different machines.
Distributed Training Setup on AWS EC2
We will first set up two machines, one master machine and one worker machine. Then we may use EC2 AMI to clone as many worker machines as you want.
Create two EC2 instances in the same zone for speed purpose, using AWS Deep Learnng AMI (optional). Make sure the SSH port and All TCP ports are open (0 - 65535) in your security group. You may refer to this tutorial , if you don’t have the experience using AWS EC2.
Install AutoTorch on each machine. If you have other dependencies in your customized training scripts, please also install them.
Make the worker machine accessible by the master machine through ssh. The following steps may be needed:
Generate ssh key by executing ssh-keygen on master machine.
Copy the public key from master machine cat ~/.ssh/id_rsa.pub and paste the terminal output to the worker machine ~/.ssh/authorized_keys.
ssh worker_ip_address to the worker machine through master. (Note that the worker ip address can be found at the terminal, for example ubuntu@ip-172-31-23-33 means the ip address is 172.31.23.33)
Upload the datasets or large files to each machines if needed.
Create EC2 image of the worker machine, and use that to create more worker machines if needed.
You are all set for running experiments. Just provide the list of remote ip addresses to the scheduler.
If the above steps are too complicated for you, please see our tutorial using AWS SageMaker.


